Showing posts with label Unit 30 - Camera and lighting techniques for moving image production. Show all posts

Tuesday, 25 November 2014

Hard drive failure 10/11/2014

A failure in my hard drive, resulted in me loosing my filming footage, which I filmed in preparation for my film, inspired by the American New Wave.
This has encouraged me to back-up all of my work in numerous places, to ensure nothing like this happens again. I will be using the same design brief as before, with the same intention and roughly similar shots, re-done.

Monday, 20 October 2014

Camera techniques - Shallow depth of field

Here is a video clip and a couple of photographs demonstrating shallow depth of field.

For the video I used a shallow depth of field of approx f/4. I set the camera to a manual focus, and manually put the lens out of focus, this meant that when the subject was a distance away from the camera she was blurred, however when she moved closer to the camera she came into focus. This technique was used in New Wave to separate the main subject from their surroundings. The camera was on a fluid head tripod, with a shutter speed of approx 1/60, and an ISO of approx 150/200.

Using a shallow depth of field for film has the same effect for still images. I photographed these images with a higher aperture than I used for the video, however it still has the same effect in distinguishing the main focal point and 'taking it away' from the surroundings.

New Wave film design brief

For this task I will be planning, shooting and editing a New Wave film, based around the American New Wave. This genre of film challenged the Hollywood stereotype of film, and broke the rules of cinema. After researching the New Wave, I have gathered enough techniques and qualities of the genre that I plan to adapt and use. I want to use similar features such as long takes, jump cuts, natural lighting, diegetic sound and urban environments.
New Wave films were experimental, which I intend to simulate in my own film. I am researching Taxi Driver, The Graduate and One Flew Over the Cuckoo's Nest, and plan to use techniques used in these films, but experiment with other elements to make my film different and individual.
My main aim is to create a montage sequence, looking as though it could be a sequence from part of a film. New Wave films do not tend to use actors and actresses, using people candidly and a lot of improvisation e.g. movement and dialogue. I will not be planning much of a narrative, as I want to capture footage that gives a true representation people in day-to-day life. I will be using shots from busy bustling locations, to isolated lonely places, giving binary opposition and experimental qualities.

I will be considering health and safety as I shoot, with regards to equipment, and locations. Ensuring that we are away from danger e.g. busy roads.

Here are some examples of techniques that I plan to use, in addition to others, as shown in my selected films:
Eye-level camera and framing in Taxi Driver.

Candid crowds in The Graduate.

Shallow depth of field in One Flew Over the Cuckoo's Nest.

Camera techniques - Using a reflector

Using a reflector whilst filming can make a big difference to the lighting, whilst still using natural light. Reflectors are a cheap and effective method of catching light and projecting it onto a specific area/subject. New Wave films used reflectors, a good example being Easy Rider, where a reflection of a reflector can be seen on a large copper tower. Mistakes like this in New Wave films were not corrected and added authenticity.

I have a homemade reflector, which I made from a large piece of cardboard, attaching plain white paper onto one side, and tin foil onto the other side. The white side casts a very soft and clean light onto the subject and is useful in a studio when a flash is used, or when there is ample light outside, like during a sunny noon-time shoot. The reflective silver side is great for shooting in low light, or where a strong light is needed, however this light can be too strong for mid-day shooting unless it is feathered away. Most photographers use the silver side of a reflector more, as it casts a stronger reflection. I made this for my AS photography course 2 years ago, and still have it. If I find it as effective whilst filming as I did when taking photographs, then I will be using a reflector for my New Wave film.
Professional reflectors can often have a gold or black side. The gold side casts a very strong warm light onto the subject, whilst the black side is an anti-reflector, which photographers use to cast a shadow onto certain areas of the subject.

Below are some images that I have taken with a reflector, showing the changes in light by using the plain white side, and then the shiny silver side. In my opinion this technique is very effective in emphasising natural light, which was a very common feature of New Wave film. I could have improved by experimenting in different locations and weather conditions, also by using a wider range of coloured reflectors e.g. gold and black.
Using no reflector.

The white side of a reflector.

The silver side of a reflector.

Sunday, 5 October 2014

Camera techniques - ISO, aperture and shutter speed

ISO:
ISO is the sensitivity level of your camera to available light. The lower the ISO number, the less sensitive it is to light, whilst a higher ISO number increases the sensitivity of the camera. The component within the camera which can change sensitivity is called the image sensor. It is the most important and expensive part of the camera, being responsible for gathering light and transforming it into an image. With increased sensitivity, the camera sensor can capture images in low-light environments without having to use flash. But higher sensitivity comes at an expense, adding noise and grain to the pictures.
Here are comparisons between different ISO settings, the difference is clear, the higher the ISO number, the more noise and grain, compared to a lower ISO setting.

Every camera has a base ISO, which is typically the lowest ISO number of the sensor that can produce the highest image quality, without adding noise and grain. On most modern cameras, the base ISO is typically 100-200. Ideally, the base ISO should always be stuck to, to attain the highest image quality, although this can be difficult, especially when working in low-light conditions. The increase in ISO numbers go in geometric progression (power of two), so the ISO sequence is 100, 200, 400, 800, 1600, 3200, 6400 etc. Each step between the numbers effectively doubles the sensitivity of the sensor.

ISO speed examples...
ISO 100 - 1 second.
ISO 200 - 1/2 of a second.
ISO 400 - 1/4 of a second.
ISO 800 - 1/8 of a second.
ISO 1600 - 1/16 of a second.
ISO 3200 - 1/32 of a second.

Aperture and depth of field:
Aperture is the opening of the lens. When you hit the shutter release button of your camera, a hole opens up that allows your cameras image sensor to catch a glimpse of the scene you're wanting to capture. The aperture that you set impacts the size of that hole. The larger the hole the more light gets in, and the smaller the hole, the less light.
Aperture is measured in 'f-stops'. They are shown in f/numbers e.g. f/2.8, f/4, f/5.6, f/8, f/22. Moving from one f-stop to the next doubles or halves the amount of light that gets in. Large apertures that let lots of light through are given smaller f/stop numbers, and smaller apertures where less light gets through have a larger f-stop number. So f/2.8 is larger than f/22.
The depth of field (DOF) is the amount of your shot that will be in focus. A large/extended depth of field means that most of the image will be in focus, whether it is close to your camera of far away. Small/shallow death of field means that only part of the image will be in focus and the rest will be fuzzy.
The first image (top) has a large depth of field as both the foreground and background are in focus, taken with an aperture of f/22. The second image (bottom) has a shallow depth of field, as only part of the image is in focus, this image was taken with a very shallow depth of field at f/4.5.

In most landscape photography, a small aperture will be used, to ensure that the foreground to the horizon is relatively in focus. Portrait photography usually has the main subject in focus with a blurry background to ensure that the subject is the main focal point and that other elements of the shot are not too distracting. In this case you would use a large aperture to ensure a shallow depth of field.

Shutter speed:
Shutter speed is basically the amount of time that the shutter is open. In film photography it was the length of time that the film was exposed to the scene that was being shot, and similarly in digital photography, it is the time that your image sensor 'sees' the scene that you are attempting to capture. It is measured in seconds, or in most cases, fractions of seconds. The larger the denominator the faster the speed e.g. 1/1000 is much faster than 1/30. A shutter speed of 1/60 or higher is most commonly used, because anything slower than this is very difficult to use without getting camera shake, and in that case, blur of the image. Using a slow shutter speed, anything under 1/60 will need either a tripod or some form of image stabilisation. Shutter speeds usually double e.g. 1/500, 1/250, 1/125, 1/60, 1/30, 1/15, 1/8 etc. There is also an option to use slow shutter speeds e.g. 1 second, 10 seconds, 30 seconds etc. These are used in very low light situations, when you're going after special effects and/or when you're trying to capture a lot of movement in a shot. Some cameras also give the option to shoot in bulb mode (B). This lets you keep the shutter open for as long as you hold it down.
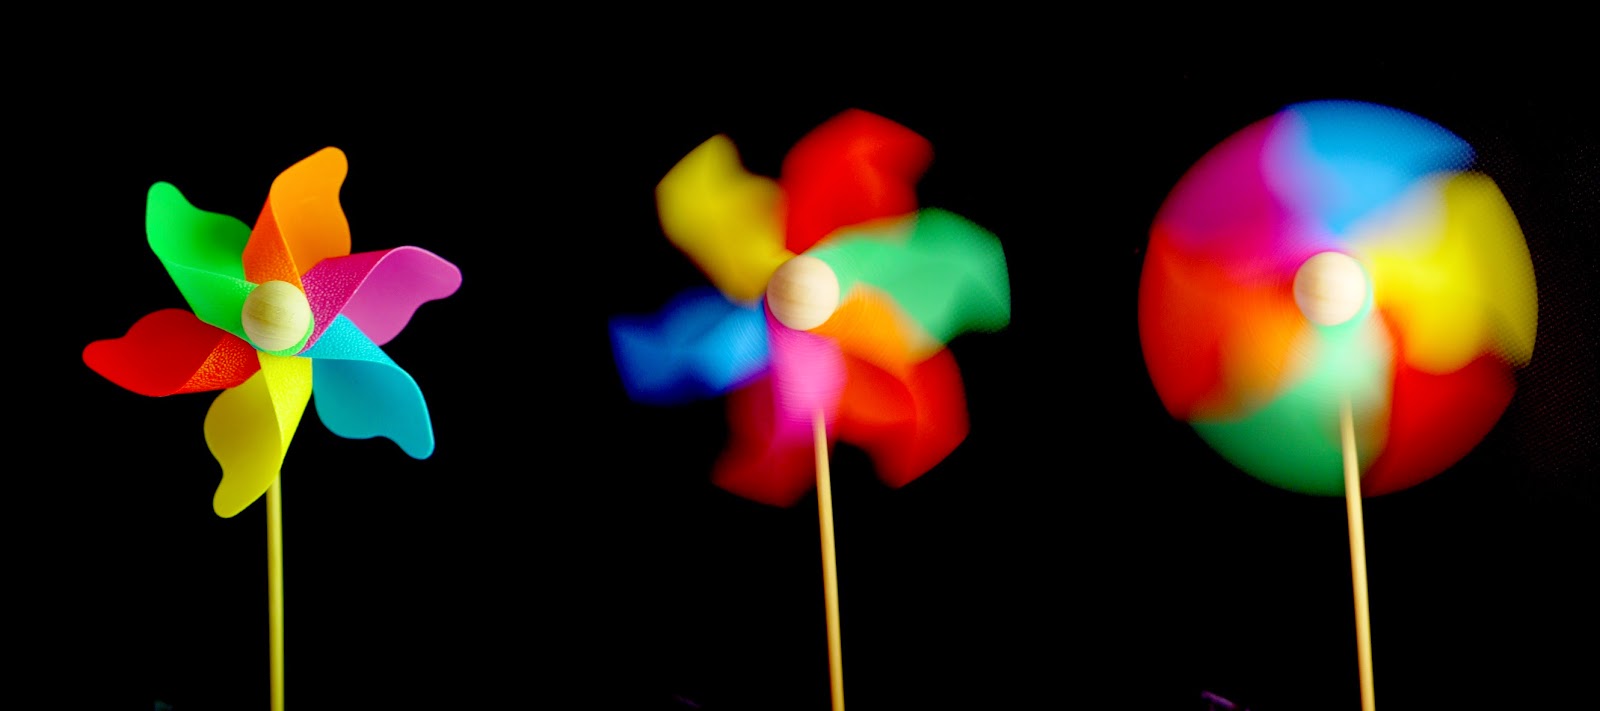
 Here are examples of fast and slow shutter speeds. The first image (top) travels from left to right with a fast, mid and then slow shutter speed. The second image (bottom) has a slow shutter speed, this can be identified by the water current.

Nottingham shoot 30/9/2014

Myself, Megan and Rory went to Nottingham to shoot for our New Wave film. We planned features of the shoot together, such as the location, date, times and equipment. Other aspects we arranged ourselves e.g. where to shoot within the city, which shots we wanted and techniques we wanted to use individually. I feel that the shoot was a success, although I will need to go out and film again, as there are more shots that I want in my film, which I had not planned at the time of the Nottingham shoot.
I did not plan in too much detail which I shots I wanted to shoot, as the original New Wave films were not planned and spontaneous. I wanted to achieve a similar feel and outcome to the classic New Wave, which is why I only planned parts of the shoot. However, doing this resulted in a lack of footage, as during and after the shoot I thought of new shots that I wanted in my film. I can film locally for some of this, as I do not necessarily have to go to a major city every time. This has encouraged me to plan my shoots better in the future, to minimize the amount of filming, although I would shoot again anyway as I am not 100% happy with the footage I have from Nottingham, and want to achieve some variation.
I will be posting short videos of my footage with a brief analysis of what I did and why, followed by the full edit of my New Wave film and evaluation.

Wednesday, 24 September 2014

New Wave film - Nottingham location scouting

Myself, Megan and Rory have decided to shoot for our New Wave film in Nottingham. We have chosen this area as we can film in a busy urban environment, in addition to some scenic pituresque locations such as Wollaton Hall. We will be shooting footage from around 10:00-14:00. After editing our footage, we will result with a new wave film around 4-5 minutes long. I have made a plan of action (shown underneath), listed with brief information that we need to shoot, e.g the type of equipment that we need, lighting and sound techniques. We were originally planning to shoot in Oxford, but a change in travel circumstances resulted in us having to change our location. Thankfully we found out in advance, so we did not have to change our shooting plans too much.

Some techniques I will be using are:
- Short shot length, as used in New Wave films.
- Handheld shots and static/tripod shots, panning.
- Tracking and panning shots, following people walking around the city.
- Depth of field, experimenting with shallow depth of field and extended depth of field.

 An online conversation between myself, Megan and Rory discussing and briefly planning the date/location.

Train times and prices of the day that we plan to shoot in Nottingham.

The weather forecast for the planned day. Tuesday 20th September.

Equipment: For this shoot we will be needing a Canon 5D mark II camera, a Canon 40D camera to shoot stills for evidence, camera battery x2, compact flash cards x2, a standard photography tripod or a fluid head tripod and possibly a reflector.
Lighting: I will be using natural lighting for this shoot, as New Wave films classically use natural lighting. I will be shooting predominantly outdoors, however shooting indoors would allow for use of artificial lighting.
Sound: The sound will be diegetic.
Locations: Around Nottingham City Centre and Wollaton Hall.
Weather: Above is a weather forecast for the planned day of shooting. The forecast is light cloud, which will allow for an adequate amount of natural lighting, not too overcast or sunny.
Dates: Tuesday 30th September.
Roles: I will be travelling to Nottingham with Megan and Rory from the group. We will all be filming separately, despite using similar locations and shots.

S Parade/Old Market Square/Nottingham Town Hall.

Wollaton Hall.

The bus journey from Nottingham City Centre to Wollaton Hall.

Premiere Pro bins and clip labelling

  • Once I launched Premiere Pro and imported my video clips, I changed the viewing settings to list view, this helps the system to operate at a faster pace and allows more information to be seen when viewing the clips. One of the benefits of using list view is metadata of each individual clip is easier to view. This helps greatly when editing as it allows the clips to be organised effectively, depending on which metadata you want to make viewable.
  • I then created a new 'bin'. This can be done by selecting the option at the bottom right of the imported clips section. This makes it a lot easier to divide clips and sequences.
  • I re-named each clip with a relevant title for the subject, as when editing it makes it easier and faster to go straight to a desired file, rather than going through each individual one with similar file names.
  • I also added text to my video clips, as it makes it a lot clearer to distinguish which lighting technique is used at which point. This can be done by selecting 'new item' then 'title'.
Altering metadata.

Creating a new bin.

Re-naming file names.

Adding text to a video clip.

Monday, 22 September 2014

Lighting techniques video 17/09/2014


Here is a video that I have shot and edited, to show the differences and effects of rembrandt, butterfly and edge lighting.

I feel that this video is effective in portraying different lighting techniques, as short video clips give the video depth and shows the importance of lighting in different moods/scenarios. E.g. butterfly lighting was used in the 1950's and 1960's on film stars, as it was seen as more glamorous and complimentary. I added audio to my clip, as I felt it was incomplete without any sound. I converted and imported a song titled That Positive Feeling by Alumo, from YouTube. Since learning how to do this I will be using non-diegetic sound more often in other videos, as I feel it gives it something extra to the video and demonstrates my progression of using Premiere Pro.

If I were to improve on the video I would make it slightly longer and show the lighting techniques with the subject in different positions e.g. facing different ways to show the lighting is effective and can be set up accordingly. However, I am pleased with the edit, despite it being short and simple, as it was my first time using the software and learnt me the basics of editing. Editing the video together was the first time I have used Premiere Pro. I feel that after now learning the basics of the programme, I am now more confident to edit in the future, especially with the New Wave video we are to plan, shoot and edit within the upcoming weeks.

Before shooting in the studio, we researched health and safety. We ensured that everybody knew where the fire exits were in the event of a fire and were required to use them, especially as there were numerous people in a fairly small low lit room. We also made sure that there were no obstructions blocking any doors or fire exits, and a clear pathway to the fire exits were achieved. When setting the studio lights up, we made sure that they were switched off at the wall plug socket. The wires were securely wrapped around their stands, and taped to the floor to prevent anybody tripping over them, and possibly knocking a light over. The lights also get very hot if they are on for an extended period of time, so we needed to make sure that before handling/moving them, that they were in the correct position beforehand or cool, to avoid any burns.

Lighting techniques evidence 17/09/2014

As a group we practiced lighting techniques. We tested rembrandt, butterfly and edge lighting. After setting up the studio and lights, we each filmed short clips of the lighting technique in action. Each technique connotes different era's, moods and emotions. They are achieved by setting up the studio lights and subject in different ways.

Rembrandt lighting:
  • Rembrandt lighting is a lighting technique that is used in studio portraiture photography. It can be achieved using one light and a reflector (fill light). It is popular because it can create images with considered lighting by using a minimum of equipment. Rembrandt lighting is characterised by an illuminated triangle under the eye of the subject, on the less illuminated side of the face. It is named after the Dutch painter Rembrandt, who often used this type of lighting.
  • The umbrella light is the key source of light, positioned at a 45 degree point in regards to the subject, and angled at a 45 degree angle pointing at the subject. The height is around a foot and a half above the subjects head. The subject is not looking or body pointing into/at the camera. The single light source is sometimes counter balanced with a reflector, placed approximately 45 degrees offset to the shadowed side of the face. This reduces contrast and begins to light the image softly rather than hard.
Butterfly lighting:
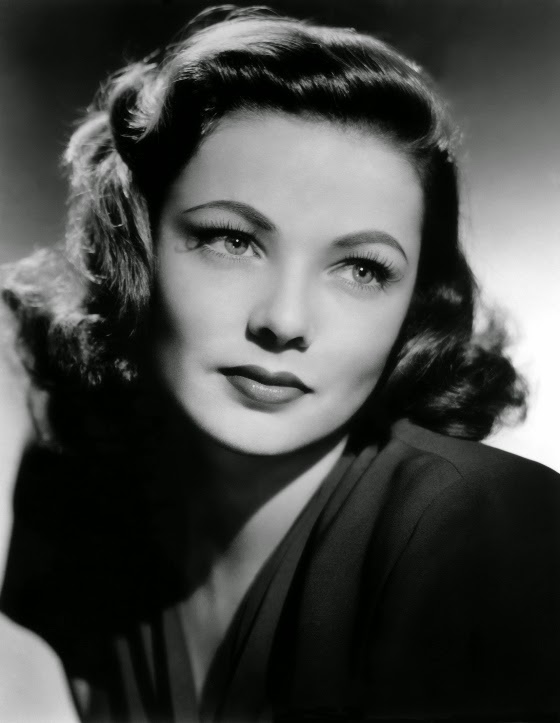
  • This technique takes the key light up much higher than the subject and is pointing downwards onto them to cast a butterfly type shadow on their face. It is thought to project more glamorous and complimentary connotations. This was used on film stars around the 1950's and 1960's.
  • The light is positioned directly in front of the subject. The key light is placed about 2-3 foot higher than the subjects head behind the camera, angled  at a 70/80 degree angle, so the light beams down onto the subject. The subject is looking straight towards the direction of the camera, with their body positioned straight into the lens. The camera is directly in front of them.
Edge/split lighting:
  • Edge lighting is slightly more dramatic than Rembrandt lighting, and hugely more so than Butterfly. It defines and seperates one side of the face from the other more obviously. The highlights are lighter and the low lights darker, therefore the contrast is higher.
  • The key light is parallel to the subject at 90 degrees, positioned at the same height as the subjects eyes. The subject looks 25 degrees to the side of the camera, so the light source will only capture half of the face. A fill light can be added in the form of a reflector. Wherever the reflector is placed will dictate the strength of the contrast.

Monday, 15 September 2014

Pre-production of recreating A Blonde in Love - Weather

Below is the weather forecasts for the days that we plan to film. 15/09/2014, 16/09/2014, 17/09/2014, 18/09/2014. This planning will enable us to shoot more accurately, to achieve a closer weather forecast to the scene in A Blonde in Love.


Pre-production of recreating A Blonde in Love - Plan

Pre-production
Equipment: For this task we will be using a Canon 5D mark II camera to film, a Canon 40D camera to document the process, camera battery x2, compact flash card x2, and a fluid head tripod.

Lighting: We will be using natural lighting, as new wave films are filmed naturally and spontaneously, without a need for artificial lighting equipment.

Sound: Classic new wave films feature natural noise of the surrounding environment. Subtitles are widely used, especially in foreign new wave. For our recreation of A Blonde in Love we will be using natural diegetic sound with the use of subtitles added in the editing process, however with no dialogue.

Locations: We will be filming around King Edward VI college and the surrounding area. We will location scout the area first to find buildings/places that resemble the locations featured in A Blonde in Love. Shooting around college enables us to film whenever is convenient and re-film any shots that we feel necessary.

Weather: Looking at the weather forecast before shooting will help us to decide which day/which time of day to shoot. The scene from A Blonde in Love features overcast foggy weather. We will aim to film at a time of day closest to this, however the weather is not a major factor, so long as it is not a stark contrast e.g. heavy rain or snow.

Dates: We plan to film on 15/09/2014, 16/09/2014, 17/09/2014, 18/09/2014. As we plan to film over a 4 day period, we will be able to shoot shorter shots at each time and plan more thoroughly, as opposed to rushing the shots and it not resembling the scene of A Blonde in Love.

Roles within the group: I will be documenting/logging the group by taking photographs for evidence, Rory will be directing, Jordan will be operating the camera, Connor will be lighting and location scouting, and we will be using actors from an AS drama class at the college.

A Blonde in Love


During this task we will be separated into 2 groups, re-creating this scene from the 1965 classic Czechoslovakian new wave film, The Loves of a Blonde (A Blonde in Love), directed by Milos Forman.
Our group consists of myself, Rory, Jordan and Connor.

French New Wave

The influence that French New Wave has had on film is said to be a 'cultural revolution'. Prompting the birth of the auteur, a film director who influences their films so much that they rank as their author. The New Wave approach allowed for a greater sense of flexibility, erasing the boundaries between professional and amateur cinema/fiction and documentary. The low budgets allow exploration of contemporary film, with an unrestricted narrative, giving the director a wider scope to experiment and be creative. The cinematic styles of the French New Wave brought a fresh new look to cinema with improvised dialogue, rapid scene changes and shots that go beyond the common 180 degree axis. The camera was not used to mesmerise the audience with elaborate narrative and intense visuals, but to play with the expectations of cinema. Typical conventions emphasised tight control over the filmmaking process, however, the New Wave deliberately avoided this. They often filmed in public locations with improvised dialogue and plots constructed on the fly. In many ways, it seemed sloppy, but it also captured a vibrancy and spontaneity that no 'quality' film could hope to match.


Key texts:
  • À Bout de Souffle (1960).
  • Les Mistons (1958). 
  • Et Dieu crêa la femme (1956).
  • Les Quatre cent coups (1959).
  • Jules et Jim (1962).
  • Le Boucher (1970).
  • La Peau Deuce (1964).
  • Charlotte et son Jules (1960).
  • Pierrot le Fou (1965).
Filming techniques:
  • Natural lighting to achieve a sharp contrast between black and white, often conveying a sense of realism in spontaneous street environments.
  • Alternative framing for fast and sensitive shots.
  • Self reference, using certain cinematic techniques and director styles.
  • Collaboration with cinematographers.
  • Reportage (the hidden camera).
  • Making deliberate mistakes.
  • Liberation of the camera from the tripod, using handheld angles. New Wave filmmakers were helped in shooting by new generations of camera.
  • Scenes were often shot in public locations so they could move the camera around very easily, creating long tracking shots and flowing camera movement around a given space. They could also shoot in tight quarters, creating an intimacy that bulkier and more expensive cameras couldn't rival. Many New Wave films use long and extended shots, which hand-held cameras facilitated.
Editing techniques:
  • Flash pans.
  • Discontinuity of shot.
  • Jump cuts are sudden, jarring editing cuts which take place out of sequence or during an unexpected moment. They often involve camera angle changes of less than 30 degrees, which can have a disorienting effect on the viewer. Traditional filmmaking rejected such cuts because they threw the viewer out of the onscreen drama. To New Wave filmmakers, that was precisely the point.
  • Modern montage.
  • Rapid re-framing, jumping from one shot to another.
  • Long takes, using static/mobile or lateral tracking.
  • A disregard to continuity editing.
  • Breaking the rules...and creating new ones.
  • Syncopated editing.
Sound techniques:
  • Interior monologues and random comments.
  • Modern soundtracks.
  • Transcribing, using direct sound and post synchronization (early New Wave films were post synchronized).
  • Sacrificing the sound for authenticity.
  • French New Wave filmmakers often discarded the use of remixing their sound. Instead, they used a naturalistic soundtrack recorded during the shoot and shown unaltered, despite often featuring mistakes and intrusions. This lent the films a sense of freshness and energy that earlier movies lacked.