Showing posts with label Camera techniques. Show all posts

Friday, 12 December 2014

Camera techniques - Timelapse (un-finished)

Timelapse is a video technique where the camera is set to record a series of numerous images, or minutes/hours of film footage, with the film rate sped up to show a short montage of fast moving footage.

I feel that this would be a brilliant technique to use in my film based around Lacan's lack theory, as I plan on conveying a theme of emptiness and isolation. I would use this technique effectively by using an actor standing in a busy location/crowd, with people carrying on in their day-to-day lives, and my actor standing still in the crowd. This would show a sense of loneliness effectively, especially at dusk, when the light has a transition of light to dark, showing an extended period of time. I plan to use this technique, in addition to other similar ones, showing a separation from society and human interaction, such as shallow depth of field and soft focus.

Experimentation:
Here I experimented with the technique myself. Placing my camera on a tripod and filming my subject in a busy location, standing still for approx 2 minutes, then speeding up the frame rate in post-production, via Premiere Pro. This is a test sample of the technique, to experiment whether it works effectively or not, so I can use it in my film footage.

...video will shortly follow!

Friday, 5 December 2014

Camera techniques - Soft focus

Soft focus in camera/film can be achieved by smearing petroleum jelly/Vaseline on the camera lens. This can be a time consuming process and can be achieved by smearing, cleaning and then reapplying it after each shot. This technique is also known as vaselensing. It creates a blur around the model, diverting focus from everybody around. This process was used for the endoskeleton in The Terminator, the pterodactyl's wings in When Dinosaurs Ruled the Earth, and the terror dogs sequence in Ghostbusters.

This clever technique goes back to the early days of photography and video. Giving a nice soft focus around the edges of the frame. Another way of doing this technique is by using a cheap UV filter, and carefully smearing vaseline on that, so not to damage the camera lens. Other substances would work effectively, however vaseline is the most common used, as it is known to be effective and is a cheap alternative, giving a dream-like effect. Commonly used in old films and portrait photography to soften the image slightly. An alternative to vaseline is using an old pantyhose, filtering it across the lens for a soft focus of the entire lens, rather than just around the edges.

Monday, 20 October 2014

Camera techniques - Shallow depth of field

Here is a video clip and a couple of photographs demonstrating shallow depth of field.

For the video I used a shallow depth of field of approx f/4. I set the camera to a manual focus, and manually put the lens out of focus, this meant that when the subject was a distance away from the camera she was blurred, however when she moved closer to the camera she came into focus. This technique was used in New Wave to separate the main subject from their surroundings. The camera was on a fluid head tripod, with a shutter speed of approx 1/60, and an ISO of approx 150/200.

Using a shallow depth of field for film has the same effect for still images. I photographed these images with a higher aperture than I used for the video, however it still has the same effect in distinguishing the main focal point and 'taking it away' from the surroundings.

Camera techniques - Using a reflector

Using a reflector whilst filming can make a big difference to the lighting, whilst still using natural light. Reflectors are a cheap and effective method of catching light and projecting it onto a specific area/subject. New Wave films used reflectors, a good example being Easy Rider, where a reflection of a reflector can be seen on a large copper tower. Mistakes like this in New Wave films were not corrected and added authenticity.

I have a homemade reflector, which I made from a large piece of cardboard, attaching plain white paper onto one side, and tin foil onto the other side. The white side casts a very soft and clean light onto the subject and is useful in a studio when a flash is used, or when there is ample light outside, like during a sunny noon-time shoot. The reflective silver side is great for shooting in low light, or where a strong light is needed, however this light can be too strong for mid-day shooting unless it is feathered away. Most photographers use the silver side of a reflector more, as it casts a stronger reflection. I made this for my AS photography course 2 years ago, and still have it. If I find it as effective whilst filming as I did when taking photographs, then I will be using a reflector for my New Wave film.
Professional reflectors can often have a gold or black side. The gold side casts a very strong warm light onto the subject, whilst the black side is an anti-reflector, which photographers use to cast a shadow onto certain areas of the subject.

Below are some images that I have taken with a reflector, showing the changes in light by using the plain white side, and then the shiny silver side. In my opinion this technique is very effective in emphasising natural light, which was a very common feature of New Wave film. I could have improved by experimenting in different locations and weather conditions, also by using a wider range of coloured reflectors e.g. gold and black.
Using no reflector.

The white side of a reflector.

The silver side of a reflector.

Sunday, 5 October 2014

Camera techniques - ISO, aperture and shutter speed

ISO:
ISO is the sensitivity level of your camera to available light. The lower the ISO number, the less sensitive it is to light, whilst a higher ISO number increases the sensitivity of the camera. The component within the camera which can change sensitivity is called the image sensor. It is the most important and expensive part of the camera, being responsible for gathering light and transforming it into an image. With increased sensitivity, the camera sensor can capture images in low-light environments without having to use flash. But higher sensitivity comes at an expense, adding noise and grain to the pictures.
Here are comparisons between different ISO settings, the difference is clear, the higher the ISO number, the more noise and grain, compared to a lower ISO setting.

Every camera has a base ISO, which is typically the lowest ISO number of the sensor that can produce the highest image quality, without adding noise and grain. On most modern cameras, the base ISO is typically 100-200. Ideally, the base ISO should always be stuck to, to attain the highest image quality, although this can be difficult, especially when working in low-light conditions. The increase in ISO numbers go in geometric progression (power of two), so the ISO sequence is 100, 200, 400, 800, 1600, 3200, 6400 etc. Each step between the numbers effectively doubles the sensitivity of the sensor.

ISO speed examples...
ISO 100 - 1 second.
ISO 200 - 1/2 of a second.
ISO 400 - 1/4 of a second.
ISO 800 - 1/8 of a second.
ISO 1600 - 1/16 of a second.
ISO 3200 - 1/32 of a second.

Aperture and depth of field:
Aperture is the opening of the lens. When you hit the shutter release button of your camera, a hole opens up that allows your cameras image sensor to catch a glimpse of the scene you're wanting to capture. The aperture that you set impacts the size of that hole. The larger the hole the more light gets in, and the smaller the hole, the less light.
Aperture is measured in 'f-stops'. They are shown in f/numbers e.g. f/2.8, f/4, f/5.6, f/8, f/22. Moving from one f-stop to the next doubles or halves the amount of light that gets in. Large apertures that let lots of light through are given smaller f/stop numbers, and smaller apertures where less light gets through have a larger f-stop number. So f/2.8 is larger than f/22.
The depth of field (DOF) is the amount of your shot that will be in focus. A large/extended depth of field means that most of the image will be in focus, whether it is close to your camera of far away. Small/shallow death of field means that only part of the image will be in focus and the rest will be fuzzy.
The first image (top) has a large depth of field as both the foreground and background are in focus, taken with an aperture of f/22. The second image (bottom) has a shallow depth of field, as only part of the image is in focus, this image was taken with a very shallow depth of field at f/4.5.

In most landscape photography, a small aperture will be used, to ensure that the foreground to the horizon is relatively in focus. Portrait photography usually has the main subject in focus with a blurry background to ensure that the subject is the main focal point and that other elements of the shot are not too distracting. In this case you would use a large aperture to ensure a shallow depth of field.

Shutter speed:
Shutter speed is basically the amount of time that the shutter is open. In film photography it was the length of time that the film was exposed to the scene that was being shot, and similarly in digital photography, it is the time that your image sensor 'sees' the scene that you are attempting to capture. It is measured in seconds, or in most cases, fractions of seconds. The larger the denominator the faster the speed e.g. 1/1000 is much faster than 1/30. A shutter speed of 1/60 or higher is most commonly used, because anything slower than this is very difficult to use without getting camera shake, and in that case, blur of the image. Using a slow shutter speed, anything under 1/60 will need either a tripod or some form of image stabilisation. Shutter speeds usually double e.g. 1/500, 1/250, 1/125, 1/60, 1/30, 1/15, 1/8 etc. There is also an option to use slow shutter speeds e.g. 1 second, 10 seconds, 30 seconds etc. These are used in very low light situations, when you're going after special effects and/or when you're trying to capture a lot of movement in a shot. Some cameras also give the option to shoot in bulb mode (B). This lets you keep the shutter open for as long as you hold it down.
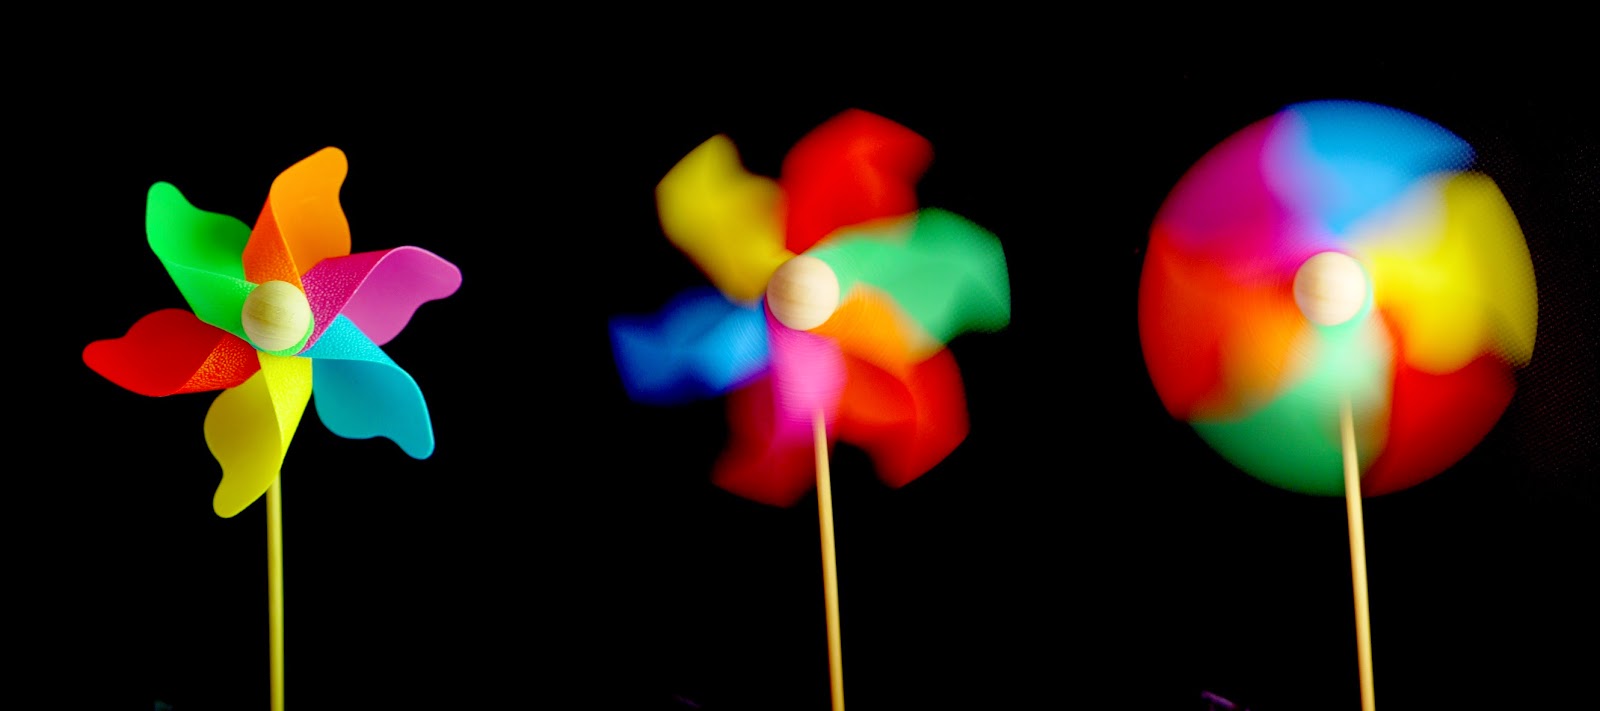
 Here are examples of fast and slow shutter speeds. The first image (top) travels from left to right with a fast, mid and then slow shutter speed. The second image (bottom) has a slow shutter speed, this can be identified by the water current.